
Tale of Two Chairs
Two examples of chairs: both French, both from iconic periods and locations of French design and craftsmanship, both from a noted craftsman/designer and their workshops, both upholstered and gilt wood frame armchairs, both water gilded gold leaf, both with extensive gilding losses that were extremely visible, both damaged and needing treatment, both important enough to deserve conservation. The two examples of chairs are comparable in many ways but with completely different levels of problems.

One example is a set of two fauteuils from the second half of the eighteenth century. A fauteuil is style of armchair that has an upholstered seat, back, and armrests, has open arms, and has a primarily exposed wood frame that is often gilded. The set of chairs are stamped on the inside of the back seat rail: “I. GOVDRIN” (the V for a U).

This is the stamp of Jean-Baptiste Gourdin, a French furniture maker/carpenter (menuisier) active in Paris from the mid to later part of the eighteenth century (c. 1723-1781). He was the son of Jean Gourdin (c. 1690-1764), the older brother of Michel Gourdin (c. 1724-1797), and the son-in-law of Claude Ferret, all well known master furniture makers as well.[1] This was one of the high points of French decorative arts. The highest level of furniture makers at the time was tightly controlled, requiring a long apprenticeship, journeymanship, and the presentation of a masterpiece to a jury before admission to the guild of corporation was possible. This need for long training starting early and connections within the craft to obtain inclusion meant many families had more than one master craftsman, and it became a family business where Jean-Baptiste’s apprenticeship differs in that it was served with master sculptor Toussaint Foliot (c. 1715-1798) who actually came from a family of chair makers.
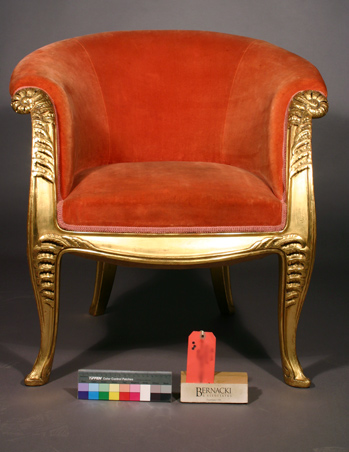
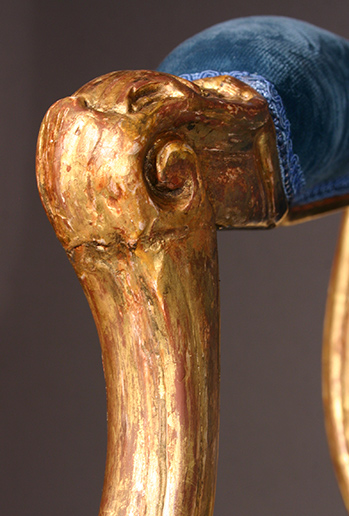
The second example is a bergere from the workshop of Louis Majorelle (c. 1859-1926). Bergeres are enclosed upholstered armchairs that are usually wider than fauteuils, often have loose seat cushions, and have exposed wood frames that are carved and often gilded.
Majorelle, along with glassmaker Emile Galle, was one of the most influential designers and creators of the Art Nouveau style. His father was a furniture maker and Louis eventually took over the family business in the French city of Nancy. But, like Gourdin, much of his early training was more art-based that included study at the Ecole-des-Beaux-Arts in Paris. Nancy, in the later 1800’s and early 1900’s, was a nationally and eventually internationally recognized center of craftsmanship with both Majorelle’s and Galle’s workshops/factories at the forefront.[2]
These are two examples of French craftsmanship with many similarities though separated by well over a hundred years. When first viewed in photos, both examples showed extensive existent gilding with many areas of gilding loss, both large and small, with many losses showing the bright white areas of exposed gesso that are obviously relatively recent.
When the chairs arrived in our studio, both examples had structurally sound frames which were the result of both superior design and sound construction. The structural condition of the gilding on the two examples though was very different.
On the Majorelle chair all of the existent gilding was completely stable with virtually no delamination or flaking of the gesso or gilding. All of the losses were due directly to wear and impact, and were not caused by failure of the gilding methods or materials. Consequently, almost no consolidation was needed. The chair could have been used in its present condition without treatment. The impact of the losses was primarily visual and aesthetic. The absolute minimal treatment would only be minor consolidation followed by proper care as far as temperature and humidity changes and the avoidance of impact and wear where possible.

Applying a layer of gesso to damaged areas
The eighteenth-century fauteuils were received in individual crates. When the tops were opened and the chairs were inspected, it was very apparent that the gesso was extensively delaminating with visible pieces of detached gesso at the bottom of the crates. The delamination was so extensive that the chairs could not be removed from the crates and moved without extreme caution. The already detached pieces of gesso were put in re-sealable plastic bags and marked as to placement where possible. A large plastic furniture bag was worked under each chair so any detached pieces would be caught if they fell off during movement. The chairs were then moved into the studio incased in plastic tied at the top.
The chairs were then assessed with the plastic unfolded so the chairs were still sitting in it so any pieces falling off would be caught. When a carved and sculptural gilt surface suffers systemic gesso delamination, there can be many completely detached pieces that are held in place through only friction, gravity, and sculptural integration.

Deep damage to gesso


This problem of gesso delamination can be caused by both long-term and short, drastic changes in environment with temperature and humidity being the main culprits. In the specific case of these two chairs, as in the majority of water gilded surfaces, you have a wood substrate covered in gesso and gilding. The protein-based water-soluble glues or binders used in traditional gesso will retain the ability to move, swell, and shrink due to humidity changes much longer and more substantially than many other binders, but eventually the gesso will become inert and brittle.
Properly mixed gesso has the capability to last for centuries. There are documented examples of relatively stable calcium carbonate gesso dating earlier than 1500 B.C.E. on pieces taken out of Egyptian tombs. The problem is often keeping this gesso adhered to the substrate.
Wood evolved as a water transportation system between a plant’s roots and its leaves/blossoms/seeds. Until wood has deteriorated to such an extent that it is literally falling apart, it will retain some ability to accept moisture (swell) and dry out (shrink), the inevitable long-term result being shrinkage. When you have a gesso covered wood substrate this movement between materials causes stresses with possible damages as a result. This means eventually the wood substrate can change its size and shape while the gesso coating cannot; something has to give.
If this shrinkage is long, gradual, controlled, and does not include drastic or substantial swings or spikes in environmental conditions, the bond between substrate and coating can be maintained. If the gesso was properly prepared and applied, it can accommodate this gradual shrinkage by releasing this subsequent pressure through cracking. This cracking can happen while not snapping the bond between the wood substrate and the gesso. Properly prepared and applied gesso can be surprisingly accommodating to these changes if they are relatively controlled and gradual. Old paintings on canvas and objects made from wood, plaster, composition, etc. can have a gesso coating that has extensively cracked, yet the bond to the substrate is sound.
Serious problems come when this bond to the substrate is not capable of surviving these changes and movement. These problems can be the result of one extreme change or the combination and accumulation of many. A quick and drastic change could be something like a fire with the subsequent moisture infusion through humidity spikes or reductions due to failure of HVAC systems, and possible inappropriate and/or accelerated drying. This drastic swelling and shrinkage of the wood substrate can essentially blow or explode the gesso coating off without destroying the bonds between the gesso, bole, and gold leaf, leaving detached fragments of gilded gesso.
On the other hand, the progress of a gilded wood object through time involves the inevitable gradual entropic shrinkage of the non-living wood. When this is combined with periodic seasonal changes, this same separation and failure of the bond between gesso and wood can happen. If the changes are gradual and controlled, an “accommodation” can often be reached between the wood and gesso though the strength and stability of this can be difficult to assess until the object is subjected to a quick and untypical environmental change, even if relatively small. Many pieces have entered the studio that evidenced no drastic problems (flaking, lifting, delaminating, losses) until they were moved from one environment to another where they quickly began developing problems. This could be moving from one continent to another, one latitudinal location to another, one location with one level of HVAC control to a different one, or from a shaded cool room to the room next door and placed next to a working fireplace in constant direct sunlight.
This delamination of the gesso will not happen consistently across an object. Gesso will often first release along the edges at the change of planes such as along the edges of a picture or chair frame, or along the edges of sharp, prominent carvings. ((Tip: If you are newly gilding or re-gilding a piece or an area, make sure to sand lightly all of the sharp wood edges so they are slightly rounded. This will give the gesso a change to remain attached longer. If you need the sharp edge for aesthetic reasons, you can get that in the gesso through sanding or carving.))
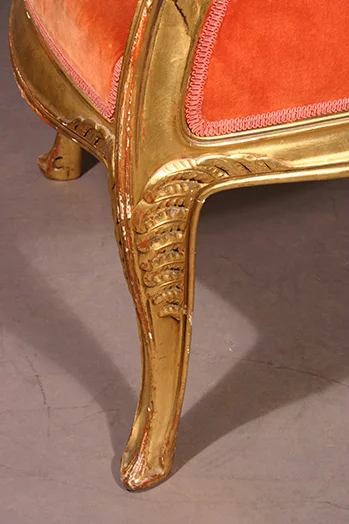
Convex surfaces are more problematic than concave surfaces. One reason is gesso has more compressive strength than tensile strength. On the concave surface as the wood substrate shrinks (with possible periods of swelling) it will pull the gesso in along with it. This essentially compresses it into a smaller space. On the convex surfaces, such as the back or inside of cabriole furniture legs, the wood substrate will shrink away from the gesso. At the worst this will leave the gesso suspended over a thin film of air completely detached from the wood like a suit of clothes that is now the wrong size, not because the suit has shrunk, but rather the person inside. The problem is this suit is not made of flexible cloth, but a thin brittle shell of exposed gesso. This shell has no tensile strength and can break and fracture through its own inevitable shrinkage without substrate support or through any impact or pressure. The impact could be as direct as being bumped by something hard to as minor as the impact of a piece being picked up, carried, and set down.
When this fracturing happens losses can form surrounded by areas of detaching pieces just holding on. All it takes is for something to catch an edge of a detaching piece, such as a cleaning cloth, clothing, or moving pad, to create a hole in a gilded surface with a large irreversible loss of original material and finish.
How to repair or reverse this process? The only way is to reestablish that bond between the gesso and substrate. To do this some form of adhesive must be returned into the separation. This can be very difficult as the detachment of the pieces of gesso can extend as far as an inch or two back from exposed edges. Any adhesive used must be able to wick all the way under a detaching area or you risk leaving air pockets that can cause the same problems, even fracturing through just the slight swell and shrinkage as the repaired areas dry if a water-based adhesive is used.
I am a traditionalist, so I use rabbit skin gelatin thinned with water as needed. This is both for the reason that it is comparable to what would have been originally used and I find the warm water-based adhesive to be more efficacious. The question of reversibility is basically mute because any adhesive properly applied to satisfactorily take care of the problem is going to be incapable of being reversed without destroying the gilding. The water-based gelatin has centuries of proven track results and also has the benefit of softening the old gesso. This means the gesso can be reattached and reformed at the same time, making the suit fit again.
Application is difficult and sometimes small losses are necessary to ensure long-term stability of the majority. The first and least invasive method is to introduce glue under the edges of the delaminating piece. The detaching piece(s) can first be pried up as much as possible using a tool. I primarily use an X-acto knife with the blade sanded so it is not sharp. The glue can be introduced by a small brush or sometimes small syringes, though syringes can often cause the brittle gesso to pop off. Once as much adhesive as possible has been introduced as far under the loose piece as possible, alternating pressure can be applied through your fingers or tools to cause the loose piece to move up and down siphoning the glue further under. The object can also be placed so that gravity will also assist. Glue should be applied until excess starts to come back out of as many exposed edges as possible. When as much adhesive as possible has been applied to an area, it should be left awhile (5, 10, 15 minutes) to allow the gesso to soften enough so the detaching pieces ban be reformed and reattached. Two problems to avoid: adding too much adhesive so the detaching pieces will not go all the way back down and too much manipulation of the softening pieces causing either deformation of the surface of damage to the gilding. Sometimes clamps can be used but this is rare as the softening gesso is susceptible to pressure and can adhere to the clamps. Usually the best method is finger clamping long enough for the detached piece to stay flat. Once these detaching pieces will stay flat without pressure, the adherence should be stable when the glue dries.
Many times the delamination is too extensive to get enough adhesive in from just the edges. At this point a decision is necessary. If the piece is important enough that any invasive treatment must be avoided, it must first be determined if any pieces are in danger of immediate detachment. The object then must be kept in a rigorously maintained environment (temperature and humidity primarily), not moved without treatment, extensively documented as far as present condition, and regularly reassessed. To remedy this problem otherwise, enough delaminating must be removed in order to enable treatment of all the problem areas.
First, it must be determined whether or not a delaminating area can be removed without shattering and ending up with a pile of gesso pieces impossible to realistically realign. The goal is to remove as big a section of delaminating gesso with clearly defined edges so they can be properly relayed. By inserting a tool under the leading edge of the piece, pry it up gradually until the piece breaks off. Some surface is needed underneath the area to catch any pieces you cannot hold and they should be kept in order to relay. After removing the minimal sections necessary, all of the lifting areas around the detached pieces must be attached. Then glue is applied to the exposed substrate and to the backs of the detached pieces. After waiting a few minutes (5, 10, 15) for the glue to soak into and soften the detached pieces they can be reattached using assorted tools and finger pressure to reattach and reform. This often requires going back and forth from different areas working until the entire piece stays attached. This method can cause some small losses as old gesso almost never breaks perfectly cleanly and it will elave a new crack line where the pieces break off. The prime advantage is being able to get a complete and solid bond.
Once both examples of chairs were consolidated and stabilized, the further treatment is similar but very different in extent.
At this point it must be decided if infilling the losses is appropriate and desirable. On both of these examples the relatively recent losses exposed bright white areas of gesso that were very visible and aesthetically distracting. Also on both, but especially the eighteenth-century fauteuils, these extensive losses left many jagged and rough edges of gesso even though the repaired areas were stable. These edges still present potential areas of damage during further use and maintenance.
Infilling the gesso and gilding losses would return an aesthetically complete appearance. It would also complete the consolidation process, cover and protect the edges of the original areas of gilding around the losses, and further protect these areas from moisture intrusion by completing the gilded surface.
Both examples of chairs were privately owned and were going to be used so they needed to be stable. Both clients wanted a return to a more intact appearance, but were also both mindful of the importance of the pieces and the need for the chairs to dictate the extent of the repairs.
The fresh gesso losses were then filled with new gesso. Old gesso losses that had a patina, were stable, and did not distract from the overall appearance were not infilled. Gesso has to be applied in layers and must be allowed to dry or set up sufficiently before additional layers are added. If deep losses are infilled too quickly, the bottom of the gesso infill will not have sufficient exposure to air and will not set up properly and can cause the entire infill to fail.
As traditional gesso is water-based and sets up through evaporation it shrinks as it dries. This means any infills have to be over-filled to cover this shrinkage. These infills then need to be taken down to blend into the profile of the original gilding. This can be done with extremely controlled sanding and/or warm water with a combination of cloth or carving tools. Probably the biggest problem and risk of doing this type of infill is if the process is not rigorously controlled, the repaired area can begin to grow larger very quickly, eating original surfaces. The crucial element is to keep cleaning back away from the edges of the repair onto the infill and not on the original surface. It is also vital to always use the minimal amount of moisture and abrasion.
Bole was then applied to the infills. First, a yellow ochre background, and then layers of burgundy tinted with pigments to blend in with the original surfaces. During this application the boles were also used sparingly over areas that had original gesso but were missing the original bole and gilding. At the end of each application, the infills were cleaned back off any overlapping on original gild surfaces.
The infilled areas were then re-gilded using gold leaf. Both of these examples were created at a time when French gilding often used 22kt leaf which gives a lighter greenish-gold tone. The color of the leaf is influenced by both the karat and the percentage of the other metals added. 22kt French pale leaf usually only includes gold and silver without the usual copper addition which also makes it much less red. The gilding on both chairs had been repaired many times and had a patina that gave more of a 23kt appearance. The leaf used for infills was 23 kt, but with a low copper content.
The gilt infills were then cleaned back. The original gilding was then lightly cleaned using only an absolute minimal amount of water to only removed dirt and grime. Inappropriate old touch-ups (primarily bronze powders) were also removed where possible using the proper solvents. The cleaning is done at this time so any dust caused by the infills can be cleaned at the same time so the original surfaces are only cleaned once. The infills were then blended in using cleaning, distressing, some minimal burnishing, and additional gold where necessary. The larger infills were spot sealed using Agateen nitrocellulose metal lacquer where it could be kept only on the infills.
The final coatings were first a coating of Renaissance microcrystalline wax. Spot applications of dark wax and mica powder gilt creams were then used to bring back sculptural depth and further blend the infills in with the reversible top coatings. A light steel wooling of the top surfaces and exposed edges took away the sheen of new wax and gave a patina of use and wear.
The biggest difference in the gilding infills of the two examples was on the handrests of the Majorelle chair where, because of the design, shallow carving, and many hands, all of the gesso and gilding had long been rubbed off to the bare wood. The wood had been worn smooth and shiny and had probably been coated with possibly wax, lacquer, shellac, of at the very least the oil from all of those hands. This would make it tough to get new gesso to properly adhere without invasive treatment, but the extreme losses were visually distracting. The areas were sealed with shellac and oil-gilded leaf was applied and blended into the surrounding original surfaces. This infilled the gold losses in a reversible non-invasive method.


1. ˆThe GOURDIN family: A prestigious dynasty of seats carpenters
2. ˆSilas Kopf, A Marquetry Odyssey: Historical Objects and Personal Work (Hudson Hills Press, 2008), p. 20